- Overview
- Basic Zoom Meeting Security
- Secure the devices you use with Zoom
- Secure Zoom meetings with UW participants
- Secure Zoom meetings with participants external to UW
- Secure Zoom Cloud Recordings
- Additional Tips and Best Practices
- Learn more about specific security settings
Overview
Zoom’s default settings for meetings allow anyone with the link to join a Zoom meeting. This low barrier of entry makes Zoom easy to use. However, with ease comes risk. People (or bots) with access to the link can join the meeting, including those who were not invited to the meeting but were able to gain access to the meeting URL or ID.
Zoom offers a number of security options that you can use to prevent unwelcome participants from joining your meeting or to limit their ability to share inappropriate content.
Several security options are listed below, but it is not necessary to change all of these settings to protect the security of your meeting. Choose the options that will best address your specific concerns while still creating a convenient meeting space for you and your meeting participants. You can adjust settings while a meeting is in progress or when scheduling a meeting. Some security options are available only through the Zoom web portal at washington.zoom.us.
Basic Zoom Meeting Security
When scheduling
When scheduling a meeting, you can configure security settings to:
- Prevent participants from joining the meeting before a Host or Alternative Host arrives.
- Require users to authenticate themselves
- Require a meeting passcode
- Require meeting participants to register before joining your meeting
You can configure any or all of these options.
On the Schedule Meetings page/screen, under Meeting Options:
- Clear Enable join before host to prevent participants from joining the meeting until a Host or Alternative Host arrives.
- Check Require Authentication to Join to ensure all participants are logged into UW Zoom accounts. Learn more about the Require Authentication to Join option.
- Check Require meeting passcode to require passcode authentication when users enter the meeting. Passcodes can be up to 10 characters. By default, the meeting invitation will include the passcode for participants, as well as a Join Meeting link that will enter the passcode automatically for invited participants. These settings can be changed in your User Settings in the Zoom web portal at washington.zoom.us.
- Check Required Registration learn more about meeting registration options
Co-hosts can help facilitate user management, answer questions, and keep an eye on larger meetings or classes.
Co-hosts have all of the same permissions and controls as hosts in a UW Zoom meeting. Having a co-host can allow another person, such as a teaching assistant, to help run the meeting or class. Co-hosts can help manage users and user permissions, answer questions in chat, and keep an eye on larger meetings or classes. Note: The following instructions don’t apply to the Zoom app in canvas. Co-hosts should be added through the UW Zoom web portal.
Set a co-host when scheduling a meeting
- Sign in to washington.zoom.us and click on the meetings tab on the left side of the screen, or log into the Zoom application itself.
- Click on the Schedule a New Meeting button, or in the Zoom application click on the Schedule button.
- In the Alternative hosts field, enter the UW email address of co-host. Alternative hosts must be a current UW faculty, staff, or student.
Set a co-host on a meeting that is in progress
- Click on the Participants icon in the in-meeting toolbar that appears at the bottom of the Zoom meeting.
- Using your mouse, hover over the name of the user you want to make co-host.
- Click the More dropdown that appears to the right of the users name, and select the Make Co-Host option.
During the meeting
During a Zoom meeting, there are several security options available in the Host Tools menu of the toolbar, making it easy to change settings during a meeting.

Enable Waiting Room, Share Screen and Chat will appear on the security menu if you have turned them on through the Zoom web portal at washington.zoom.us. Turning off Share Screen prevents participants from annotating, taking remote control, or using the Whiteboard.
During a meeting, you can prevent participants from sharing their screen, keep participants muted, or remove participants.
You can prevent participants from sharing their screen unless you have assigned them the role of Host, Co-Host, or Alternative Host.
- At the bottom of the Zoom meeting, click the small arrow to the right of the green Share button.
- From the menu, select Advanced Sharing Options.
- Under Who can share? select Only Host.
- Close out of the Advanced Sharing Options menu.
Via the Participants window, you can keep participants muted, enable the waiting room, lock the meeting to additional participants, or remove participants.
- At the bottom of the Zoom meeting, click the Participants button to open a list of participants.
- At the bottom-right corner of the list of participants, click “More” to open a menu.
- Toggle the options as desired:
- Clear Allow Participants to Unmute Themselves to ensure that only hosts can unmute participants
- Check Put attendee in waiting room upon entry to require that hosts manually admit new participants rather than having them join the meeting automatically. Learn more about the Zoom Waiting Room feature.
- Check Lock meeting to prevent any additional participants from joining the meeting after this option is selected.
Remove participants who are behaving inappropriately
- At the bottom of the Zoom meeting, click the Participants button to open a list of participants.
- In the participant list, hover your cursor over the name of the participant you wish to remove, then click the More button that appears to the right.
- From the bottom of the menu, select Remove.
- A dialog box will open asking you to confirm your choice. Click OK to remove the participant.
Pause Zoom meeting and remove participants
Hosts and co-hosts can temporarily pause the meeting and remove a disruptive participant. To pause the meeting, click the Host tools icon, then click Suspend Participant Activities.
All video, audio, in-meeting chat, annotation, screen sharing, and recording during that time will stop, and Breakout Rooms will close.
You will be asked if you want to report a user from your meeting, share any details, and optionally include a screenshot. Once you click Submit, the reported user will be removed from your meeting, and Zoom’s Trust & Safety team will be notified. You may resume your meeting by individually re-enabling the features you want to use. Zoom will also send you an email after the meeting to gather more information.
Using the waiting room
Attendees cannot join until a host admits them from the waiting room.
When Waiting room is turned on, attendees cannot join a meeting until a host admits them individually from the waiting room. If Waiting room is enabled, the option for attendees to join the meeting before the host arrives is automatically disabled.
- Sign in to the UW Zoom web portal at washington.zoom.us.
- In the left sidebar, click Settings and then click Security.
- Scroll to Waiting room and make sure that the setting is on.
To enhance meeting security, Zoom requires the waiting room to be enabled for all meetings (or to use a passcode, formerly known as password). To simplify the process for allowing people with a UW NetID to join a meeting, you can set an option for them to join the meeting without waiting to be admitted from the waiting room.
Note: For any meeting where you want non-authenticated users to join the waiting room, make sure the meeting option Only authenticated users can join is turned off. If this setting is turned on, participants will be prevented from joining the meeting or waiting room in any form if they are not logged in with their UW NetID.
Note: If authenticated meeting participants are having difficulty bypassing the waiting room, you might ask them to make sure they are using the most recent version of Zoom. Review Zoom’s instructions for upgrading to a new version.
- Log in to your Zoom account at https://washington.zoom.us.
- In the left sidebar, click Settings.
- Waiting Room is the second option on the page.
- Under Waiting Room Options, click Edit Options.
- In the section titled Who should go in the waiting room?, you may see Everyone selected. Select the third option: Users who are not in your account and not part of the allowed domains. When you select this option, a field appears. If you do not see uw.edu, enter it. This allows people logged in with a UW NetID to bypass the waiting room, regardless of which type of UW Zoom account they have (Standard vs. HIPAA-compliant).
- Under Who can admit participants from the waiting room?, if Host and co-hosts only is not already selected, select it.
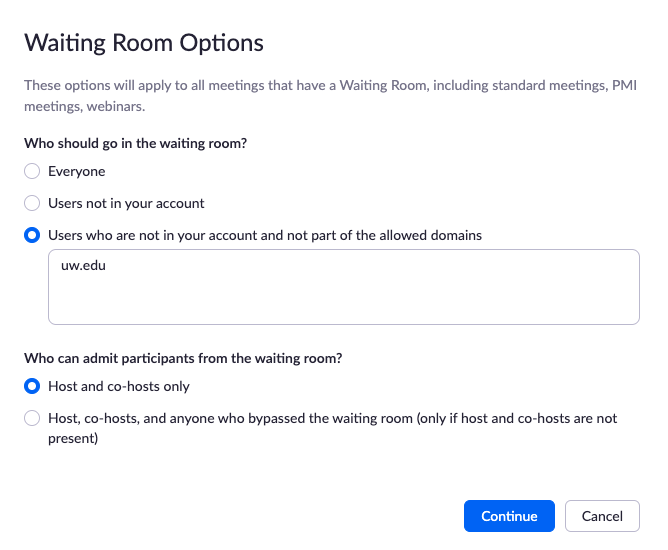
- Click the blue Continue button.
Allow participants to rename themselves
Meeting hosts have ability to allow meeting participants to change their display name in meetings and webinars. In addition to changing their name, this also allows participants to display their personal pronouns. This setting can be turned on for all of your meetings, or on a per meeting basis.
- StepsActions
- Log in to your Zoom account at https://washington.zoom.us.
- In the left sidebar, click Settings.
- Under Meetings, click In Meeting (Advanced).
- Scroll up to Allow participants to rename themselves (two settings above In Meeting Advanced).
- On the right, toggle on the setting. Participants in any meeting you now schedule will be able to rename themselves.
- StepsActions
- In your active meeting, in the toolbar below the screen, click Participants.
- At the bottom of the participants window, click More.
- Hover your cursor over Allow participants to rename themselves. When you see the blue highlight, click the text. A checkmark will appear next to the text indicating that the feature is turned on. Your meeting participants can now rename themselves.
Using passcodes
Passcodes (formerly “passwords”) provide an additional layer of security for your Zoom meetings. You can require a passcode when scheduling new meetings and/or embed a passcode into the meeting invitation link.
Passcodes are particularly useful when you are hosting:
- Small meetings where you know everyone will enter the meeting by clicking the link you have sent them
- Large meetings where you do not know the names of all participants (and therefore encounter challenges when admitting people from a waiting room)
Passcodes can be shared, so this works best with smaller meetings.
When you set a passcode on a meeting, attendees must enter the passcode for the meeting before they are able to join. Passcodes can be shared or posted to the internet, so passcodes work best for smaller meetings or classes.
- Sign in to washington.zoom.us and click on the meetings tab on the left side of the screen, or log into the Zoom application itself.
- Click on the Schedule a New Meeting button, or in the Zoom application click on the Schedule button.
- In the “Meeting passcode” section, click the checkbox next to Require meeting passcode. Use the auto-generated passcode that appears in the text box to the right or set your own custom passcode.
When you require a passcode when scheduling new meetings, users will either enter the passcode when prompted or use a meeting link that includes an encrypted passcode.
When you embed a passcode in a meeting invitation link for one-click join, participants with this custom link can bypass the step of entering the passcode manually. If this feature is disabled, the link to the meeting will not include an encrypted passcode, so participants will need to know the code in order to access the meeting.
For comparison, here is what these two formats look like:
Embedded link:
https://washington.zoom.us/j/944111234?pwd=XYkM22LTVXpxRHROaFdZTTdhR0dUUT09
Link with separate passcode (unembedded):
https://washington.zoom.us/j/944111234
passcode: 1234
Notes:
- A passcode does not guarantee that unwanted participants cannot join your meeting. Meeting links can be copied, pasted, and shared with people you have not explicitly invited. Anyone who has the link with a passcode can enter the meeting. For a more failsafe method of only admitting invited participants to a meeting, consider turning on the Zoom waiting room.
- Avoid posting passcodes or meeting links with embedded passcodes in public-facing spaces, such as websites or social media. If meeting information needs to be shared with a public audience, consider using Zoom’s registration option.
- For better passcode security, use multiple types of characters (capital letters, lowercase letters, numbers, special characters) and avoid predictable sequences (abcd, 1111, etc.)
- Sign into https://washington.zoom.us.
- Go to Settings.
- Under Security, scroll down to Require a password when scheduling new meetings.
- Toggle the switch on if necessary. This will ensure that each new meeting you schedule has a passcode enabled by default.
Note: You will still be able to turn passcodes off for individual meetings if desired, but will need to enable a Waiting Room for any meeting without a passcode.

This allows users with the link to join your meeting without being prompted for a passcode.
- Sign into https://washington.zoom.us.
- Go to Settings.
- Under Security, scroll down to Embed password in invite link for one-click join and toggle this switch on if it is not enabled already.

Now when you schedule a meeting, a unique code will be embedded in the link you send to meeting participants.
You will need to enable a passcode for each individual meeting that you scheduled previously. For previously scheduled recurring meetings, you only need to do this once for the series. Remember to resend calendar invitations for any meetings you previously scheduled in order to include the passcode.
- Sign into https://washington.zoom.us.
- Go to Meetings.
- Locate the meeting you want to add a passcode to and click the Meeting title to select and open the meeting.
- Scroll down and click Edit this Meeting.
- Scroll down and next to Meeting Password, select Require meeting password (when you select, Zoom will automatically assign a number).

- Click Save.
- To the right of Invite link, click Copy Invitation.
- Click Copy Meeting Invitation. The text is copied to the clipboard.
- Add this new information to your meeting invitation and resend so that meeting participants have the correct link.
If you primarily schedule Zoom meetings through the Microsoft Outlook plugin, updating passcodes and other meeting settings through the plugin will require a few unique steps. For instructions on updating meeting settings in the Outlook plugin, please visit the following Zoom Support guide: Microsoft Outlook plugin (desktop) | Zoom Support
Secure the devices you use with Zoom
Follow these guidelines to secure the devices you use with Zoom.
Secure Zoom meetings with UW participants
In addition to enabling waiting rooms and passcodes, consider the following for securing your Zoom meetings with UW participants.
Require authentication with a UW Net ID
Authentication with a UW NetID will prevent people from outside the UW from interrupting your class or meeting.
You will need to confirm that authentication is enabled for meetings you have already scheduled as well as for future meetings.
Verify that authentication is enabled for meetings you have already scheduled:
- Sign in to the UW Zoom web portal at washington.zoom.us.
- In the left sidebar, click Meetings.
- Open each meeting and review its settings.
- If you see a green check mark next to Require authentication to join and selected the desired sub-option, you are all set and need do nothing more.
- If you see an X next to Require authentication to join or selected the incorrect sub-option, scroll down and click Edit this Meeting and go to step 4.
- If this is a recurring meeting, in the dialog box, click All to turn on this setting for all scheduled instances of the meeting.
- Select the Require authentication to join checkbox, and then select the sub-option best suited for your meeting.
- Scroll down to the bottom of the page and click Save.
- As needed, repeat step 3 for all meetings you have scheduled to ensure that every meeting is secure.
For future meetings, you simply need to turn on the authentication setting at the time that you are scheduling the meeting. If you make the meeting recurring, this setting will persist for each instance of the meeting.
For UW Zoom meeting hosts who are not using the Zoom app in Canvas, enable authentication by following these steps:
- Sign in to the UW Zoom web portal at washington.zoom.us.
- Click Schedule a Meeting.
- Under Meeting Options, in the Security section, select Require authentication to join, and then select the sub-option best suited for your meeting.
- Scroll down to the bottom of the page and click Save.
Securing class sessions
To secure your meetings for classes or office hours, visit the following pages:
Secure Zoom meetings with participants external to UW
Public meetings
Use Webinar for public meetings and events.
Webinar allows you to host public events where users are view-only – only hosts and panelists can use video and voice.
UW Zoom Pro provides collaborative space where everyone can see one another, hear one another and each individual participant can share their screen. The Webinar is useful when you want to do a one-way push or presentation to a large audience. Attendees are view-only participants. Panelists can share audio, video, and screen.
- Information about Webinar from the UW Zoom FAQ
- Learn more about Webinar from Zoom
- Webinar options, pricing, and the UW Zoom add-on order form
Private meetings
For private meetings, you can allow participants to bypass the waiting room for meetings with both internal and external participants.
Secure Zoom Cloud Recordings
Recordings are only available to UW users by default, and settings can be changed both globally and on each video.
Meetings and classes held in UW Zoom can be recorded. You can configure both global recording settings that apply to all recordings, and also settings on individual videos that supersede global recording settings. For example, recordings are only viewable to authenticated users who have signed in with a UW NetID by default, but you can change settings on individual recordings to share them publicly.
Configure global recording settings
- Sign in to washington.zoom.us and click on the Settings tab on the left side of the screen.
- Click on the Recording tab that appears on the top screen.
Configure recording settings on an individual video
- Sign in to washington.zoom.us and click on the Recordings tab on the left side of the screen. A list of your recordings will appear.
- Using the Share or More buttons, configure settings on the individual recording.
Additional Tips and Best Practices
Turn on features only if you need them
Annotation, chat, and whiteboard are disabled by default for participants in UW Zoom to prevent misuse.
The steps to turn on Annotation, Whiteboard or Chat are nearly identical.
- Sign in to the UW Zoom web portal at washington.zoom.us.
- In the left sidebar, click Settings, and then click In Meeting (Basic).
- Scroll down to find the setting you want to turn on (or press CTRL+F / Command+F and search for “Chat,” “Annotation,” or “Whiteboard”).
- Toggle on the chosen setting(s).
These changes apply to all future meetings.
Learn more about specific security settings
Disable Join Before Host — Clear Enable join before host to prevent participants from joining the meeting until a Host or Alternative Host arrives.
Enable Waiting Room — Allows the host to control when a participant joins the meeting.
Limit Sharing to the Host — Prevents participants from screen sharing.
Meeting Passcode — Require passcodes for meeting to add an additional layer of security
Restrict Access to Join a Meeting — Allows a host to restrict participants who can join a meeting to those who are logged into Zoom, and even restrict it to Zoom users whose email address uses a certain domain.